Browser Extension Setup Guide
The CaptchaSonic Browser Extension is the easiest way to solve CAPTCHAs during manual browsing or within automation frameworks like Selenium. This guide covers installation and configuration for all supported browsers.
🚀 Key Features
- Zero-Click Solving: Automatically detects and initiates solving for most major CAPTCHA types.
- Invisible Mode: Operates in the background without obstructing your view.
- Broad Compatibility: Support for reCAPTCHA (v2/v3/Invisible), hCaptcha, GeeTest, and more.
- Blacklist Support: Define specific domains where you want to disable automatic solving.
1. Prerequisites
Before installing, you must have:
- A CaptchaSonic Account.
- An API Key from your Dashboard.
IMPORTANT
Your API key is private. Never share it or commit it to public repositories.
2. Installation
For Google Chrome
Since our extension is frequently updated with new AI models, we recommend installing the "unpacked" version for the latest features.
- Install from the Store: The easiest way — add it directly from the Chrome Web Store.
Or for the latest unreleased build:
- Download: Get the latest extension ZIP from our GitHub Releases.
- Extract: Unzip the downloaded folder to a permanent location on your drive.
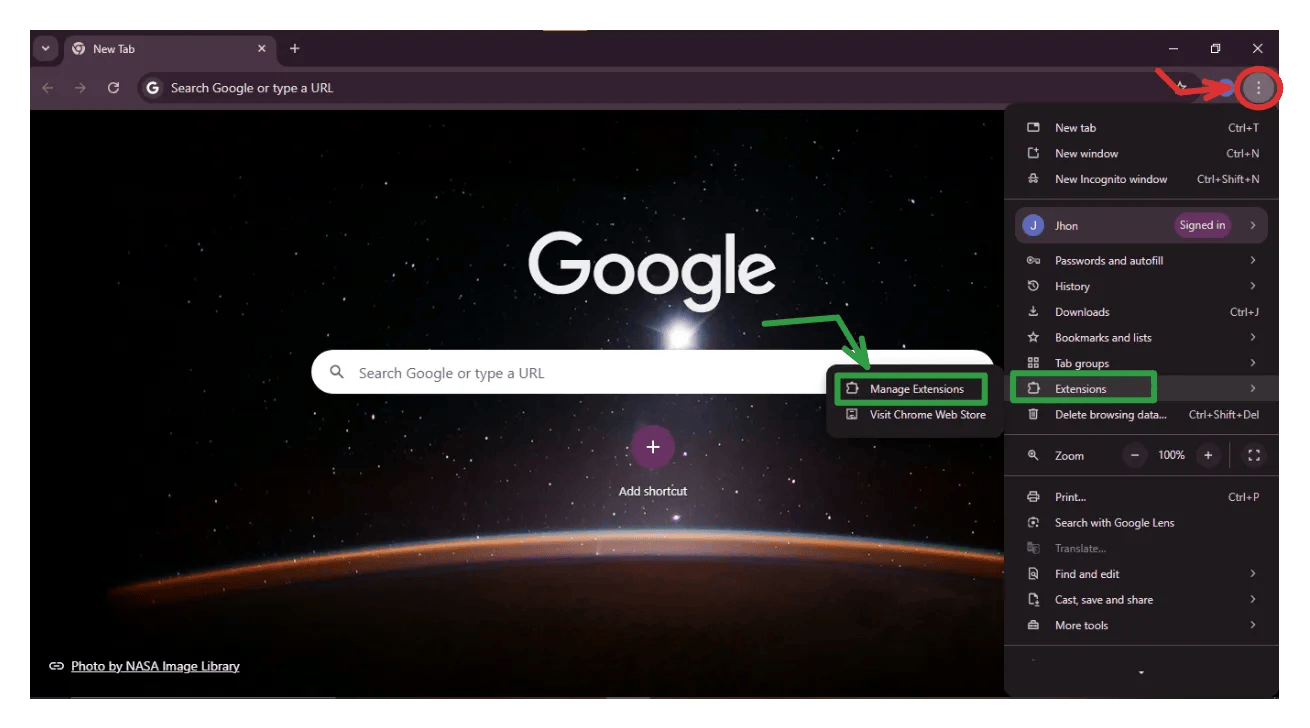
- Manage Extensions: Open Chrome and navigate to
chrome://extensions/. - Developer Mode: Enable the Developer Mode toggle in the top-right corner.
- Load Unpacked: Click the Load unpacked button and select the extracted folder.
For Mozilla Firefox
- Install from the Store: Add it directly from Firefox Add-ons.
Or install manually from a .xpi:
- Download: Grab the
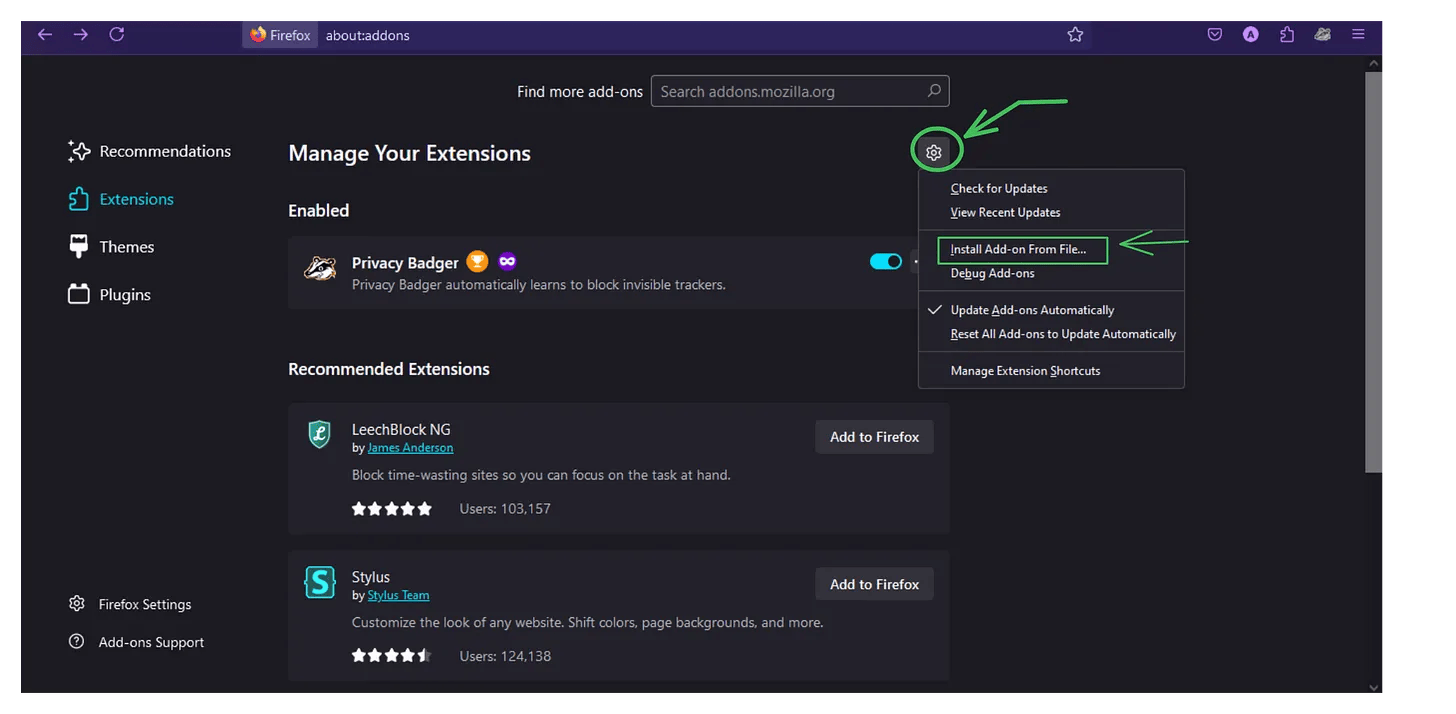
.xpifrom our GitHub Releases. - Add-ons Menu: Open Firefox, click the menu button (three lines), and select Add-ons and Themes.
- Install from File: Click the gear icon above your managed extensions and choose Install Add-on From File....
- Confirm: Select the
.xpifile and click Add.
3. Configuration
Once installed, click the CaptchaSonic icon in your browser toolbar to open the settings popup.
- Authentication: Paste your API Key into the first field and click Save.
- Enable Modules: Toggle the specific CAPTCHA types you want to solve automatically.
- Advanced Options:
- Solving Delay: Set a delay if you want to appear more human.
- Auto-Submit: Automatically clicks "Verify" after a challenge is solved.
4. Usage
The extension is designed to be "set and forget."
- Detection: When you visit a page with a CAPTCHA, the extension icon will change state to indicate it has found a challenge.
- Status: A small status badge may appear near the CAPTCHA widget showing the solving progress.
- Completion: Once solved, the extension will input the result token and, if configured, submit the form.
5. Troubleshooting (FAQ)
Q: The extension isn't solving the CAPTCHA.
- A: Check your Dashboard to ensure you have enough credits. Verify that your API key is correctly pasted in the settings.
Q: I get a "Low Score" error on reCAPTCHA v3.
- A: reCAPTCHA v3 depends on your browser's history and IP reputation. Try using a high-quality proxy or clear your browser cache.
Q: Chrome says the extension is "corrupted."
- A: This usually happens if you moved the extension folder after loading it. Simply remove it from
chrome://extensions/and click "Load unpacked" again.
6. Support
If you encounter persistent issues, please reach out to our technical team via the live chat on the Official Dashboard.
TIP
Developer Note: Doing high-volume scraping? Consider using our REST API instead of the browser extension for significantly higher throughput.