Browser Extension Setup Guide
🧩 Browser Extension Setup Guide
Install the CaptchaSonic extension and solve CAPTCHAs automatically while browsing or running automation scripts.
⏱️ Time to Complete: 3-5 minutes
🌐 Browsers: Chrome, Firefox, Edge, Brave
🤖 Automation: Works with Selenium, Playwright, Puppeteer
🎯 What You'll Learn
By the end of this guide, you'll know how to:
- ✅ Install the extension on Chrome or Firefox
- ✅ Configure your API key for automatic solving
- ✅ Enable/disable specific CAPTCHA types
- ✅ Troubleshoot common setup issues
🚀 Key Features
What makes the CaptchaSonic extension powerful:
| Feature | Description |
|---|---|
| 🎯 Zero-Click Solving | Automatically detects and solves CAPTCHAs in the background |
| 👻 Invisible Mode | Works silently without obstructing your view |
| 🔧 Broad Support | reCAPTCHA (v2/v3), hCaptcha, GeeTest, Turnstile, and more |
| ⚡ Fast Integration | 3-minute setup, no coding required |
| 🎭 Automation Ready | Works seamlessly with Selenium, Playwright, Puppeteer |
| 🚫 Blacklist Control | Disable auto-solving on specific domains |
📋 Prerequisites
Before you begin, make sure you have:
- A CaptchaSonic account with funds
- Your API Key from the Dashboard
- Chrome, Firefox, Edge, or Brave browser installed
[!IMPORTANT] Keep Your API Key Private: Never share your API key or commit it to public repositories. Anyone with your key can use your credits.
📦 Installation
Choose your browser and follow the installation steps.
For Google Chrome / Edge / Brave
We recommend the "unpacked" version for the latest AI models and features.
Step 1: Download the Extension
- Visit our GitHub Repository
- Click Code → Download ZIP
- Extract the ZIP file to a permanent location on your computer
[!TIP] Permanent Location: Place the extracted folder somewhere you won't delete it (e.g.,
Documents/BrowserExtensions/CaptchaSonic). Moving it later will break the extension.
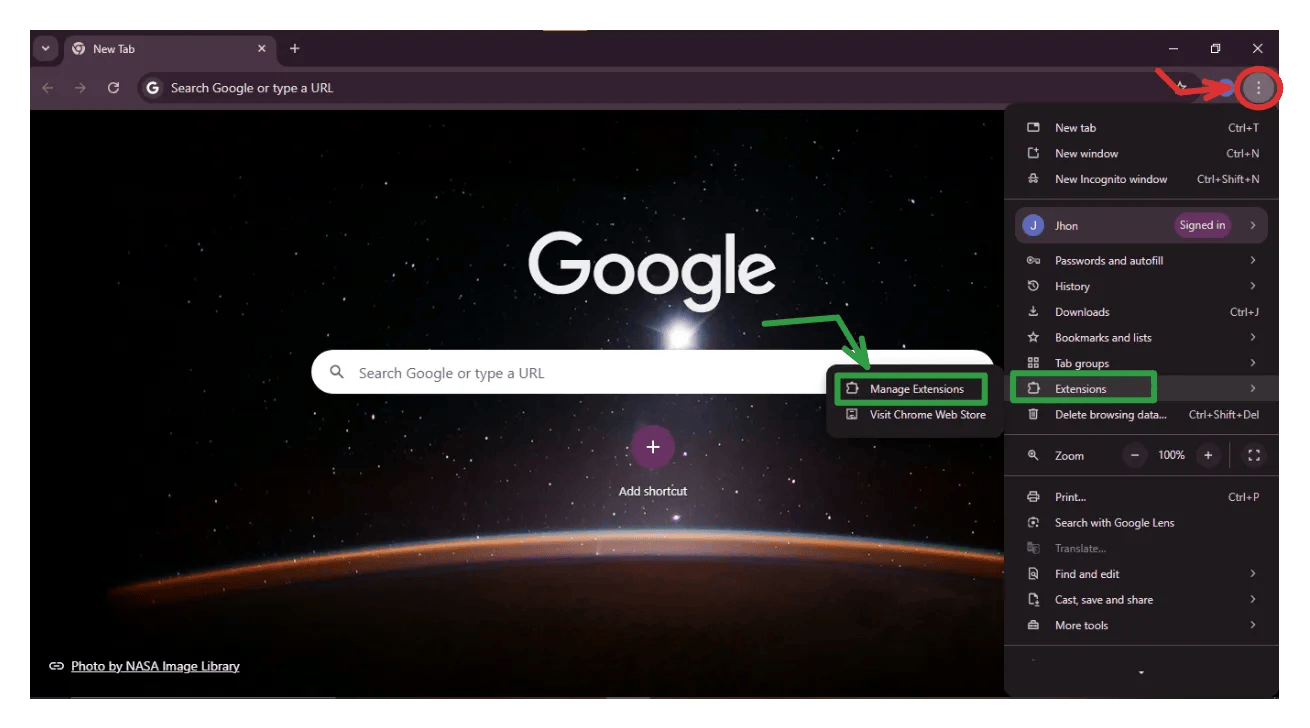
Step 2: Load into Chrome
- Open Chrome and go to
chrome://extensions/ - Toggle Developer Mode ON (top-right corner)
- Click Load unpacked
- Select the extracted folder
- The CaptchaSonic icon should appear in your toolbar
Alternative: Chrome Web Store (Coming Soon)
- Stable version available at: chrome.google.com/webstore (link TBA)
For Mozilla Firefox
Step 1: Download the Extension
- Visit the Firefox Extension Repository
- Download the latest
.xpifile
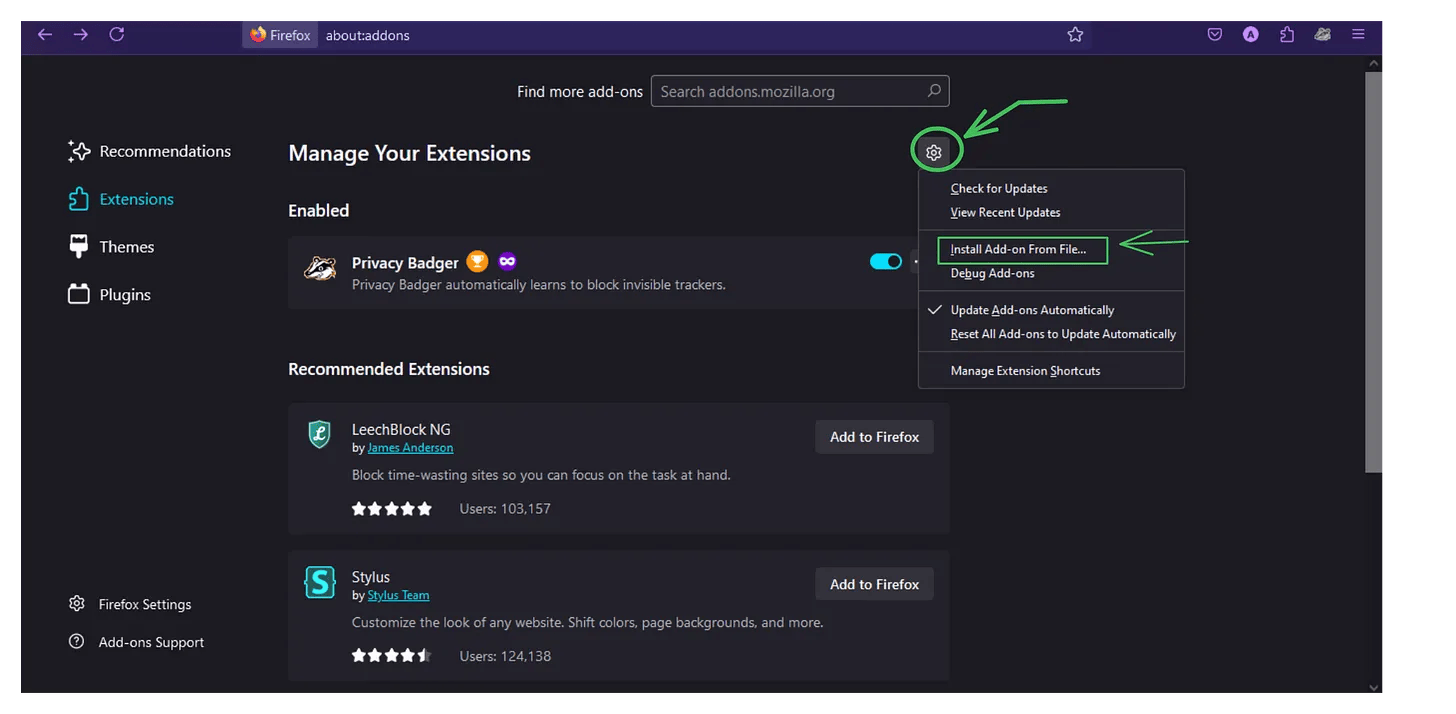
Step 2: Install
- Open Firefox
- Click the menu button (☰) → Add-ons and Themes
- Click the gear icon ⚙️ → Install Add-on From File
- Select the downloaded
.xpifile - Click Add to confirm
⚙️ Configuration
Configure the extension to work with your account.
Step 1: Open Extension Settings
- Click the CaptchaSonic icon in your browser toolbar
- The settings popup will appear
Step 2: Add Your API Key
- Copy your API key from the Dashboard
- Paste it into the API Key field
- Click Save
- You should see a green ✅ checkmark indicating successful authentication
Step 3: Enable CAPTCHA Types
Toggle which CAPTCHAs you want to solve automatically:
| CAPTCHA Type | When to Enable |
|---|---|
| reCAPTCHA v2 | Image selection grids |
| reCAPTCHA v3 | Invisible scoring system |
| hCaptcha | Privacy-focused CAPTCHA |
| GeeTest | Sliding puzzles |
| Turnstile | Cloudflare CAPTCHA |
| FunCaptcha | 3D rotation challenges |
[!NOTE] Selective Enabling: You can enable all types or only specific ones based on the sites you visit. Enabling only what you need can save credits.
Step 4: Advanced Options
Fine-tune behavior for optimal performance:
⚙️ Advanced Settings
━━━━━━━━━━━━━━━━━━━━━
✓ Auto-Solve           Enable automatic solving
  Solve Delay          0-5 seconds (for human-like behavior)
✓ Auto-Submit          Auto-click "Verify" after solving
  Domain Blacklist     Disable auto-solve on specific sites
━━━━━━━━━━━━━━━━━━━━━
Recommended Settings:
- Auto-Solve: ✅ Enabled (default)
- Solve Delay: 0-1 seconds for speed, 2-3 for stealth
- Auto-Submit: ✅ Enabled for convenience
🎮 Usage
The extension works automatically—no manual intervention needed.
How It Works
- Detection: Visit a page with a CAPTCHA
- Notification: The extension icon changes color (blue → green)
- Solving: A status badge appears on the CAPTCHA widget
- Completion: Solution is inserted automatically
- Submission: Form submits (if Auto-Submit is enabled)
Visual Indicators
| Icon State | Meaning |
|---|---|
| 🔵 Blue | Extension idle, no CAPTCHA detected |
| 🟢 Green | CAPTCHA found, solving in progress |
| ✅ Checkmark | Successfully solved |
| ❌ Red X | Error occurred (check credits/API key) |
Supported Websites
The extension works on:
- 🌐 Any website with supported CAPTCHA types
- 🛒 E-commerce sites (Nike, Shopify, etc.)
- 🎫 Ticketing platforms (Ticketmaster, etc.)
- 🔐 Authentication forms
- 🤖 Web scraping targets
🤖 Automation Integration
Use the extension with automation frameworks for powerful bot creation.
Selenium (Python)
from selenium import webdriver
from selenium.webdriver.chrome.options import Options

# Path to your extracted extension folder
extension_path = "/path/to/CaptchaSonic-Extension"

# Configure Chrome options
chrome_options = Options()
chrome_options.add_argument(f"--load-extension={extension_path}")

# Launch Chrome with extension
driver = webdriver.Chrome(options=chrome_options)
driver.get("https://example.com")
Playwright (Node.js)
const { chromium } = require('playwright');
const path = require('path');

const extensionPath = path.join(__dirname, 'CaptchaSonic-Extension');
const userDataDir = '/tmp/test-user-data-dir';

(async () => {
  const context = await chromium.launchPersistentContext(userDataDir, {
    headless: false,
    args: [
      `--disable-extensions-except=${extensionPath}`,
      `--load-extension=${extensionPath}`,
    ],
  });

  const page = await context.newPage();
  await page.goto('https://example.com');
})();
Puppeteer (Node.js)
const puppeteer = require('puppeteer');
const path = require('path');

const extensionPath = path.join(__dirname, 'CaptchaSonic-Extension');

(async () => {
  const browser = await puppeteer.launch({
    headless: false,
    args: [
      `--disable-extensions-except=${extensionPath}`,
      `--load-extension=${extensionPath}`,
    ],
  });

  const page = await browser.newPage();
  await page.goto('https://example.com');
})();
[!WARNING] Headless Mode Limitation: Extensions don't work in true headless mode (
--headless=new). Useheadless: falseor a virtual display (Xvfb) on servers.
🛠️ Troubleshooting
Problem: Extension isn't solving CAPTCHAs
Possible Causes & Solutions:
| Cause | Solution |
|---|---|
| ❌ No credits | Check your Dashboard balance |
| ❌ Wrong API key | Re-paste your API key in extension settings |
| ❌ CAPTCHA type disabled | Enable the specific CAPTCHA type in settings |
| ❌ Blacklisted domain | Check your domain blacklist settings |
Debug Steps:
- Right-click the extension icon → Inspect Popup
- Check the Console tab for error messages
- Verify the API key shows a green checkmark
- Test on a known site:
https://www.google.com/recaptcha/api2/demo
Problem: Chrome says extension is "corrupted"
Cause: You moved the extension folder after loading it.
Solution:
- Go to
chrome://extensions/ - Remove the CaptchaSonic extension
- Click Load unpacked again
- Select the extension folder in its current location
Problem: reCAPTCHA v3 returns "Low Score"
Understanding v3:
- reCAPTCHA v3 doesn't show a widget—it scores your browser
- Scores range from 0.0 (bot) to 1.0 (human)
- Low scores can be caused by:
- New/clean browser profile
- Datacenter IP addresses
- No browsing history
Solutions:
- ✅ Use residential proxies instead of datacenter IPs
- ✅ Build browser history (browse normally for 10-15 minutes)
- ✅ Use cookies from a "warmed up" browser session
- ✅ Consider using our API Mode for v3 challenges
Problem: Extension not working in automation
Common Mistakes:
# ❌ WRONG - Extension won't load
driver = webdriver.Chrome()
# Extension must be loaded via ChromeOptions

# ✅ CORRECT
options = webdriver.ChromeOptions()
options.add_argument('--load-extension=/path/to/extension')
driver = webdriver.Chrome(options=options)
Checklist:
- Extension path is absolute, not relative
-
headlessis set tofalse - API key is configured in the extension's
config.json - Extension folder hasn't been moved or deleted
💡 Best Practices
For Manual Browsing
- ✅ Enable Auto-Submit for convenience
- ✅ Use 1-2 second solve delay for natural timing
- ✅ Whitelist trusted sites to save credits
For Automation
- ✅ Pre-configure API key in
config.jsonbefore loading - ✅ Use persistent browser profiles to maintain settings
- ✅ Monitor your dashboard for credit usage
- ✅ Implement error handling for failed solves
Credit Optimization
- ✅ Only enable CAPTCHA types you actually encounter
- ✅ Use domain blacklist for sites you don't need solving
- ✅ Monitor your usage patterns in the dashboard
🔗 Related Resources
Next Steps:
- 🤖 API Automation Guide - Selenium & Playwright integration
- 📖 API Documentation - Use the REST API directly
- 💰 Add Funds - Top up your account
Advanced Topics:
- 🔌 Custom Configuration for Frameworks
- 🎯 High-Volume Automation Best Practices
- 🛡️ Proxy Integration Guide
💬 Get Support
Still having issues?
- 💬 Live Chat: Available in your Dashboard
- 📧 Email: [email protected]
- 💻 GitHub: Report bugs on our extension repository
- 📚 Community: Join our Discord for tips and tricks
[!TIP] For High-Volume Scraping: The extension is perfect for browsing and light automation. For production-scale operations (1000+ solves/day), consider using our REST API for better performance and control.
🎉 You're all set! Your browser is now equipped with automatic CAPTCHA solving. Happy automating!